Creating A Brushed Metal Icon
Hey there.![]() Brushed metal seems to be creeping up on all types web interfaces and computer interfaces now a days. I really like it. This tutorial is hopefully going to show you how to create a very simple brushed metal icon. It uses all of the basic tools in photoshop and can be created in 5 minutes. The image at the centre of the icon can be replaced with any thing you want. I've chosen the "i" that is one of the default shapes in Photoshop.
Brushed metal seems to be creeping up on all types web interfaces and computer interfaces now a days. I really like it. This tutorial is hopefully going to show you how to create a very simple brushed metal icon. It uses all of the basic tools in photoshop and can be created in 5 minutes. The image at the centre of the icon can be replaced with any thing you want. I've chosen the "i" that is one of the default shapes in Photoshop.
For this tutorial you will need:
Photoshop or similar
A basic shape pack (usually included)
A bit of spare time.
Step 1) The first step of any photoshop tutorial is to create a canvas. I like to pick a large canvas so I can scale it down and still keep all of the detail. I've chosen a 500px x 500px canvas. Pick what ever size you like. You can always use Image > Image Size to reduce the size of the image when you have done.
Step 2) The real fun now begins. Using the background layer use the rounded cornered rectangle shape within Photoshop to draw a square with rounded corners. I have picked a radius of about 40 of the corner size. Chose at your discretion.
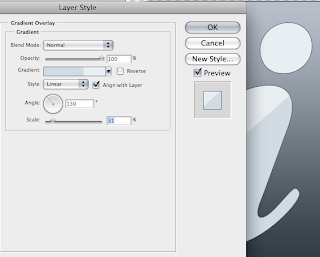
Step 3) One of the main features is the gradient background. Double click the layer, to select the layer properties. You may have to change this from a background layer, click yes when prompted. Using the Gradient Overlay function change the left hand colour to 2a363d and the right hand colour to b8c0cb. Make the gradient vertical using the angle changer. Use the following image if you get stuck.
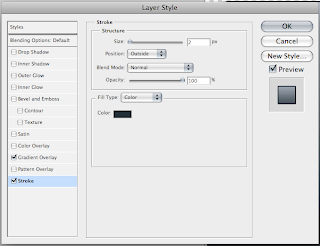
Step 4) The next step is to apply a small stroke around the outside of the image. Use the colour value of 232f36 for the stroke. Set the size to about 2 pixels. You may have to resize your shape to see all of the stroke.
Step 5) On a new layer draw your icon shape. You can pick any colour. The shape below is part of the default icon set included with Photoshop. Resize and place appropriately.
Step 6) We now need to apply the gradient effects to the icon. Using the layer properties box again, select the stroke and set the colour value to 4f5a61. Set the size to 1px.
Step 7) We are now going to add a gradient in the same way we did with the background. Use the Gradient Overlay option and create a new gradient. It doesn't really matter which way round the colours are, but the darker silver is the colour value d0dbe3 and the lighter colour is e9eef2. Move the sliders together. It doesn't matter to much were they meet, you just need more dark silver that light.
Angle the gradient so the darker colour is on the bottom. If you don't like where the colours cross on the image, use the scale option to move the gradient up and down.
Step 8) Another step is to create a Bevel and Emboss. Select the option and increase the size dramatically. Reduce the shadow amount and increase the light amount.
Step 9) One more effect to add is the inner glow. Set the value to white and slightly increase the size.
Step 10) The final step is to apply a very small Inner Shadow. Use a similar angle to the one used on the gradient, decrease the opacity until your icon looks good.
Step 11) Export and you are done.![]() This effect can be applied to any type of icon at the centre and is a very effective way to create a brushed icon. Please leave a comment with your creations or just a comment.
This effect can be applied to any type of icon at the centre and is a very effective way to create a brushed icon. Please leave a comment with your creations or just a comment.


4 comments:
Thanks a lot for this tutorial. Excellent work!
No Problem Thanks for commenting.
Thanks for a great tutorial! I'll defiatley use this on my site! :)
THanks
Post a Comment