Great Design

Welcome to Great Design. This website will look at the best designs on the internet. As well as tutorials teaching you how to produce amazing designs and get good looking results.

Fridays Website - Luis Alarcón

Jun 29, 2007

Hey

As part of the weekly ritual of Great Design here is one of the best websites on the internet. Its a Word Press blog with an amazing design. Done mostly in CSS, the header and the layout of the website looks amazing. I can't tell what the page is about. But it does look cool. Click the image for a full version or visit the website here.

 Luis Alarcón
Sorry there wasn't a post last week I was really busy visiting Leeds University.

Creating a Web 2.0 Logo From an Exisitng Logo

Jun 28, 2007

Hey

This tutorial is going to show you how to change any exiting logo into a cool Web 2.0 style logo. This is with cool gradient styles, reflections and interesting text.
For this tutorial you will need Photoshop or similar and and an existing logo (or the one provided). The Web 2.0 pack may also be useful to use, you can download it here. At any of the image you can click on them to see the full sized image.

If you are all ready and seated, lets begin.

Step 1)

The first step is to create a canvas. I use a default 500 x 500 pixel size. A large size should suffice.

Creating a Web 2.0 Logo From an Exisitng Logo
Step 2)

Once you have your canvas find you suitable pre Web 2.0 logo. I've used Digital Points logo. Although any similar style logo would do.

Creating a Web 2.0 Logo From an Exisitng Logo
Step 3)

Place or copy this into the canvas. This would be used as both a reference and suppling some of the shapes used.

Creating a Web 2.0 Logo From an Exisitng Logo
Step 4)

Use the magic wand or the marquee tool to select the logo. In this logo it is the black shape on the left. I've copied this onto a new layer.

Creating a Web 2.0 Logo From an Exisitng Logo
Step 5)

Enlarge and position on the canvas. I've enlarged the image so you can do some fine deatiled work. It can be repositioned later,

Creating a Web 2.0 Logo From an Exisitng Logo
Step 6)

These steps are used to apply effects to the logo. If you download the Web 2.0 pack, you have some of the cool styles already included.

This step involved picking a cool layer style and adding some after effects.

Creating a Web 2.0 Logo From an Exisitng Logo
One thing that is predominantly used is a drop shadow. I prefer a large dark fuzzy shadow. You can change it to suit as needed.

Creating a Web 2.0 Logo From an Exisitng Logo
Looking good. Photoshop is great for this kinda of work. The next step to mimic the work is to add some text.

Step 7)

Web 2.0 text uses a lot of Trebuchet MS, Tahoma and similar sans serif font. Take your pick.

Creating a Web 2.0 Logo From an Exisitng Logo
Step 8)

Again use the Web 2.0 styles to add a layer style. Although this can be done manually having a preset style is quicker to do.

Again in the style of the original i've picked green.

Creating a Web 2.0 Logo From an Exisitng Logo
Step 9)

Again add a small drop shadow to add effect.

Creating a Web 2.0 Logo From an Exisitng Logo
Step 10)

This step is a little tricky if you haven't done this before. This involves creating a reflective drop shadow.

First select and duplicate the layer.

Creating a Web 2.0 Logo From an Exisitng Logo
Step 11)

Reflect the layer vertically and position underneath the original. Slanted logos always look good in this configuration.

Creating a Web 2.0 Logo From an Exisitng LogoStep 12)

Apply a black to white gradient to remove parts of the image. Go Layer > Layer Mask > Reveal all. Added areas of black remove parts, white stays the same.

Creating a Web 2.0 Logo From an Exisitng LogoStep 13)

This is an optional step which you can do later. Crop the image to a more suitable size.

Creating a Web 2.0 Logo From an Exisitng Logo
Step 14)

One of the little features of the original was the little black bars. These are copied from the original although if needed by they could be recreated. Position as necessary.

Creating a Web 2.0 Logo From an Exisitng Logo
Step 15)

The effects look cool. Although with time this could be improved such as the outline of the image It isn't a bad job for 10 minutes work.
Digital Point Logo

Wallpaper Wednesday - Desktop View

Jun 27, 2007

Hey

Its Wednesday and its time for a cool image what you can use for your desktop. This weeks it is the time for a cool image for a view out of a window. Click the image for a full version.

Desktop View Wallpaper

Creating A Web 2.0 Label

Jun 21, 2007

Hey

This tutorial is all about creating and interesting and effective label which you can use to advertise parts of you website. For example you could place this above new content. To see the full image click.

For this tutorial you will need photoshop or similar, and the Web 2.0 layers and gradients pack which you can download here.

Step 1)

Create your canvas, I suggest a large size so you create lots of detail, the final image can be scaled down later.

Creating A Web 2.0 Label
Step 2)

The next step is to draw your shape, this can be any shape. Use the preset shapes in Photoshop or download some new ones off the internet. It doesn't matter what colour it is.

Creating A Web 2.0 Label
Step 3)

Next apply a layer style to the shape, I recommend using the Web 2.0 layers and gradients pack, here. Although you can make your own.

Creating A Web 2.0 Label
Step 4)

As well as this I suggest using a bevel and emboss. Use are large size and reduce the opacity of the shadow.

Creating A Web 2.0 Label
Step 5)

Add you text. I've used Trebuchet MS. Use the character palette to move the letters into a good looking spacing.

Creating A Web 2.0 Label
Step 6)

Again, use one of the white layer styles in the pack and apply this to the white text.

Creating A Web 2.0 Label
Step 7)

You now have a cool looking Web 2.0 label to add to your web pages.

Creating A Web 2.0 Label
Step 8)

One optional step that I suggest adding is a drop shadow, this adds a lifted effect to the label.

Creating A Web 2.0 Label
Step 9)

Flatten and remove the background and save as a .png. This can now be added to any web page.
Creating A Web 2.0 Label
The final label.
Creating A Web 2.0 LabelAs you can see it looks great on any web page.

Creating A Web 2.0 Label

Wallpaper Wednesday - Dark Pipes

Jun 20, 2007

Hey

Its Wednesday and that means it is time for a killer wallpapers. This week is the turn of a moody wall paper which look amazing on a wide screen monitor.
Click for full version.

Wallpaper Wednesday Dark Pipes

Hundreds of Web 2.0 Layers and Gradients

Continuing on the Web 2.0 theme, I have found and complied a large collection of about 200 + web 2.0 gradients and layer styles. These are great if you want a helping hand at creating buttons and layer styles for you website.

You can download the pack here.

For example the image below was a speech bubble shape with a layer style added. An amazing effect done in a couple of seconds.

Hundreds of Web 2.0 Layers and Gradients
As you can see from the preset manager there is a lot of style to chose from to get the best from you creations.

Hundreds of Web 2.0 Layers and Gradients
Hundreds of Web 2.0 Layers and GradientsTo install go Edit > Preset Manager > Gradients or Layer Styles > Import

You can download the pack here.

Creating A Web 2.0 Flag Icon

Jun 19, 2007

Web 2.0 Icons are every where. On websites coming into programs. This icons are graphics that have reflective shadows and look really cool. But how do you do them for country Icons. Heres how. Click any of the image to enlarge them.

You will need:

Photoshop or Similar
A Flag photo
Time

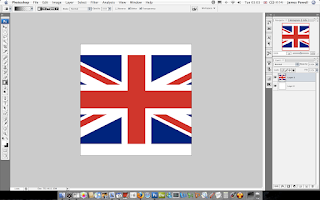
1) The first step is to set up your canvas, I chose a nice large size of 500 x 500 to get the best effect . The bigger the better because more detail can be added to the image.

Creating A Web 2.0 Flag Icon2)

The next step is to find a picture of a flag on the internet. I chose, the Union Jack. Paste this into Photoshop.

3)

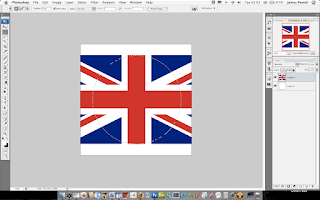
Centre your flag as necessary. You are trying to capture the centre part of the flag.

Creating A Web 2.0 Flag Icon
4)

Using the centre marquee tool draw a circle around the centre of the flag. Using the shift key to keep the aspect ratio correct. In Photoshop use space to arrange the circle as necessary.

Creating A Web 2.0 Flag Icon
5)

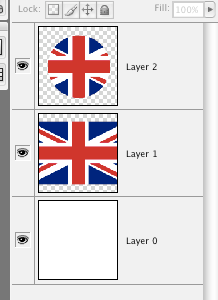
Copy and paste the centre circle onto a new layer. You can get rid of the original flag layer.

Creating A Web 2.0 Flag Icon
6)

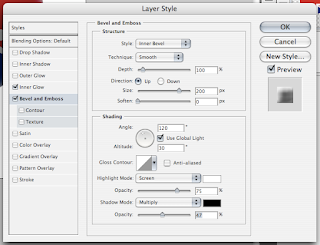
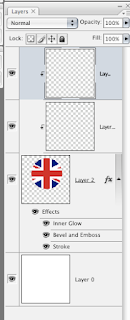
The next step is to add the layer effects to the circle layer. This is done in 3 parts. Inner glow, Bevel and Emboss, and finally a Stoke.

Use the inner glow, set the colour to white and size to 20.

Creating A Web 2.0 Flag Icon
7)

With the Bevel, set the size to 200 and if necessary reduce the opacity of the black. You don't want the shadow to be too dark.

Creating A Web 2.0 Flag Icon
8)

This is usually an optional extra but looks good if you do it. Add a stoke to the layer. The main colour of the flag is used.

Creating A Web 2.0 Flag Icon9)

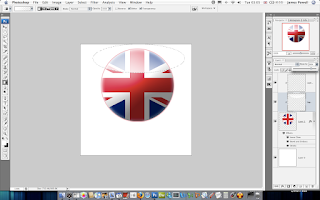
Once this is done, you have to add the main highlights that give the best effect. To do this create two new layers and turn them into a clipping mask. Two layers are used so you can adjust the opacity as needed.

Creating A Web 2.0 Flag Icon
10)

Using the marquee tool again, draw and ellipse at the top of the image. Add a white to invisible layer on to this clipping mask. Adjust the opacity as necessary.

Creating A Web 2.0 Flag Icon
11)

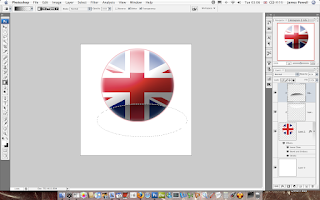
Do the same with the shadow layer. The opacity of this layer usually needs to be vastly reduced to get a good effect.

Creating A Web 2.0 Flag Icon
12)

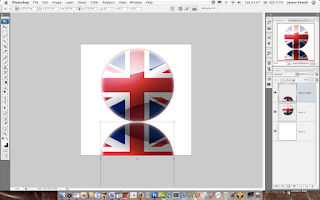
Grab both layers and rotate them slightly to the left.

Creating A Web 2.0 Flag Icon
13)

This part is used to create the reflective shadow.

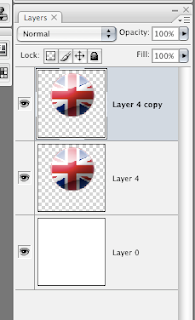
Merge all of the current layers and copy it. You should have two layers. If needed remove the white background.
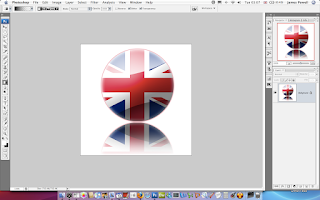
Creating A Web 2.0 Flag Icon
14)

Flip the layer vertically and position underneath.

Creating A Web 2.0 Flag Icon
15)

Create a layer mask, to reveal all. Then add a gradient fill to gently remove the opactiy as shown. This may take a couple of goes to get right.

Creating A Web 2.0 Flag Icon
There you go an Uber looking web 2.0 flag icon.

Creating A Web 2.0 Flag Icon
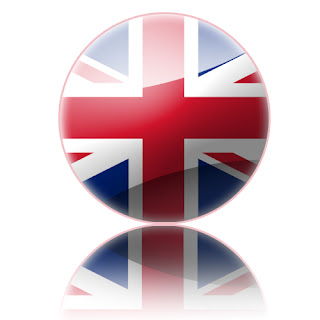
You can of course do this with other flags. And the effects are really cool. Shown below from left to right are: United Kindom, United States of America, South Korea, Earthican flag (Futurama).

Flag icons