Great Design

Welcome to Great Design. This website will look at the best designs on the internet. As well as tutorials teaching you how to produce amazing designs and get good looking results.

Aperture Tutorial - Adjusting Photos - Part 7

Aug 31, 2007

Hey

I'm a bit bored with giving you a tutorial on the interface in Aperture, so i'm going to give you a quick tutorial on modifying photos and what happens when stuff changes in the adjustments window. If you need a copy of Aperture please go to the download store to purchase a copy.

Any way moving on, i've hidden the projects pane from the window menu. I've picked a suitable photograph that could perform some minor changes.

Aperture Tutorial - Adjusting Photos
One of the biggest tools for changing photos is levels. This tool changes the levels (well duh) of a photograph, and is good for making a photo look better and fuller colours. One tip is to make sure that your monitor is accurate in its colours. A wonky coloured monitor will not help when adjusting images.

Aperture Tutorial - Adjusting Photos
Once you make any changes or select a check box within Aperture another copy will be made. This is put into a stack (more explained in later tutorials). This will be visible in the image browser.

Aperture Tutorial - Adjusting Photos
If you notice in the top right hand corner a number will be displayed, this is due to the amount of images in a stack. Every change to the master will great a new copy and increase the stack number.

Aperture Tutorial - Adjusting Photos
If you notice you can change the levels and although it makes subtle differences these are visible.

Aperture Tutorial - Adjusting Photos
If you use the compare option you can compare the different images in the stack.

Aperture Tutorial - Adjusting Photos
As you can see the more changes you make to the master the more copies in the stack that are created.

Aperture Tutorial - Adjusting Photos
Within the levels (which is one of the best tools) you can change the individual colour properties, the more changes you make the more you can modify the image. All changes are kept (unless you delete the version).

Aperture Tutorial - Adjusting PhotosAgain is you use the compare option, selecting 4 images, you can visibly compare the changes you have made. Click the image for the full size version to sheet what has happened.

Aperture Tutorial - Adjusting Photos
The view options in the bottom left corner in the control bar depicts what options you can see in the viewer.

Aperture Tutorial - Adjusting Photos
As you can see after you have adjusted an image you can promote and image which is picked (more on stacks in the next tutorial)

Aperture Tutorial - Adjusting Photos
If you want to close the stack so you don't have hundreds of the same image visible use the Stacks > Close Stack option.
Aperture Tutorial - Adjusting Photos
The four images have now become one.

Aperture Tutorial - Adjusting Photos
Now I no that this was a bit brief but I will explain all the different options that you can do to an image in later tutorials.

Aperture Tutorial - Metadata - Part 6

Aug 29, 2007

Hey

This is a continuation of the Aperture tutorials and it is moving onto the Meta data pane. This is one of the main pains you should use for tagging your photographs. Many times it has helped in finding a photo after I have used one of the features located in this pane.
You can usually find the meta data pane in the top left corner with the adjustments icon. If its missing you can always go to Window > Show Meta data.


Usually this is the default view. All of the data which you can't change is unclickable. Any data which you want to change you can use the text boxes.


The ratings and badges options are at the top. Ratings you use if with the ratings tool bar shown in the last tutorial. The badges are added automatically. I will explain in later tutorials about badges.


Captions and keywords are very very useful for finding your photos in keyword searches. I suggest you use them if you have hundreds of photos.


Most of the data you can't change is written into the EXIF data by your camera. In my case the version name is the file name of the photo.


All the extra information which is taken by your camera is shown as applicable. It's useful to have this data some times when you modifying photos.


Again going down the list, extra information such as image size. Cropping a photo would of course change the pixel size.


As you can see the text boxes allow you to add more information to your photo graph.


Again more information is added by the camera to the EXIF data. The master location is where you photographs are added.


If you think that all that data which you can add is over whelming you can add a lot more. The buttons at the bottom bring up a pane so you can add a lot more information.

For example if you click the EXIF data button a whole load of options appear, which you can add, customize as you see fit.


As you can see meta data is a really full tool which you can use to add information to your photos. Use it to organize your photos effectively.

Wallpaper Wednesday - Old Monks House

Hey

I've found a cool wallpaper that I took on holiday. The image is of an old house that was the only one to survive a devastating earth quake. You can click the image for hte full size.

Aperture Tutorial - Adjustments Interface - Part 5

Aug 27, 2007

Hey

I'm continuing on with my epic tutorial on all thing Aperture and this time it is the round of adjustments pane on the right hand side. This quick tutorial is going to tell you what each of the knobs and dials does. In a couple more lessons I will be going onto how you can use this to modify for photos. You can click any of the image to enlarge.

The adjustments pane is located on the right hand side of the window. If it is not visible you can go Window > Show Adjustments. This pane should open to the right in the Aperture window. You can use the flippy arrows to show or hide parts of the panes.

Aperture Tutorial - Adjustments Interface
At the top of the pane is the histogram. This is used to view the levels of the colour values in any given photo. It is very useful if you want to remove some dark or light edges off the colours.

Aperture Tutorial - Adjustments Interface
The exposure panel is designed to change the values given in a RAW file. These are the fine controls for an image quality for exposure, saturation, brightness, and contrast.

Aperture Tutorial - Adjustments Interface
The levels pane is very important as this controls the histogram at the top. You can change the levels for every colour value. A tool to learn how to use.

Aperture Tutorial - Adjustments Interface
The highlights and shadows works again with the levels pane and controls the light and dark values of an image.

Aperture Tutorial - Adjustments Interface
White balance is a very useful tool for making sure the white point of an image is correct and you get true colours. This pane is used for changing this value in RAW files.

Aperture Tutorial - Adjustments Interface
Colour pane is a tool that is useful for changing a specific colour value. For example if an image is to red, you can use the red colour change the hue, saturation and the other values to get this to what you want.
Aperture Tutorial - Adjustments InterfaceThis is the end of this tutorial, I didn't have much time to complete this so I am sorry it is short. You can easily view the previous tutorial by visiting this link. If you need to purchase a copy of Aperture please visit the Apple Store for more information.

Aperture Tutorial - The Image Interface - Part 4

Aug 25, 2007

Hey

I'm continuing on with my tutorials of Aperture and this time I am going into detail on the Image Interface where most of your work will be spent in organizing photos. The main use of this is to see all of your photos. I will go into detail on all of the features of each of the buttons. You can click any of the images to get the full size. You can see the rest of the series here. If you haven't all ready got your copy of Aperture please visit the Apple Store for more information.

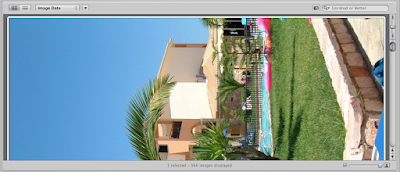
The photo below shows you the main interface. This is the middle section of the Aperture screen when you open it up. It is designed so you can quickly and easily view your photos so you can modify them and export them to external projects.

Aperture Tutorial - The Image Interface
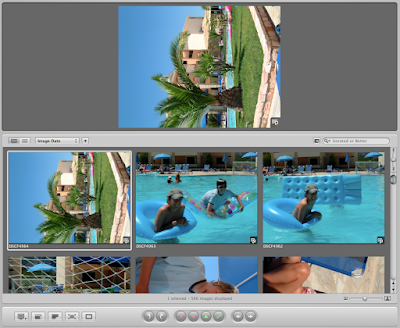
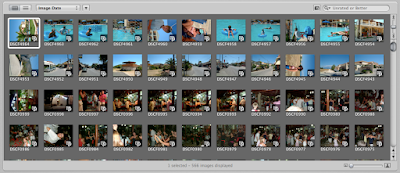
The middle section is split into two sections, the top is the viewer. This is so you can view your image. You can have as many images as you want to view in this section as you want. It isn't shown off in its best glory but it is very useful.

Aperture Tutorial - The Image Interface
The bottoms section is the browser. This area is designed so you can browse through all of your photos. Selecting more than one image will place additional shots in the view above.

Aperture Tutorial - The Image Interface
One of the other areas of the image interface is the pane at the bottom. This is used to rate and position images on screens. I will go into detail on this later.

Aperture Tutorial - The Image Interface
Viewing the data about your images is important to photographers. In the top left hand corner there is an option to view your images in thumbnail view (left) and list view (right)

Aperture Tutorial - The Image Interface
Clicking on this image changes the browser view from the thumbnail view to a list view. This gives you a lot of information that you can use to sort and view about your photos. This enables you to see all your photo (if you want to sort them) with a specific focal length, ISO, shutter speed etc.

Aperture Tutorial - The Image Interface
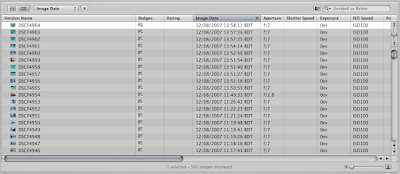
The data shown in the list view goes hand in hand with the sorting options. This again is located with in Aperture about the browser pane on the application.

The drop down box gives you a lot of options for sorting you images.

Aperture Tutorial - The Image Interface
Each option (Image Data, Rating, Version Name, File Name, Keywords, Size, Orientation, Pixel size) when clicked will order the thumbnails in the order specified.

Aperture Tutorial - The Image Interface
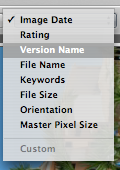
If you want them in reverse order clicking on the small arrow next to the drop down box can switch the order of the images.


Aperture Tutorial - The Image Interface
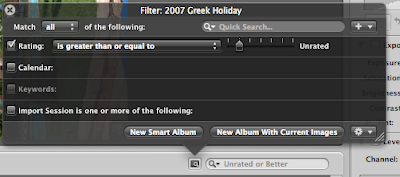
Some times, a simple ordering can be difficult to use and find an image you want if you 10,000 images to sort through. This is where the search option box comes in.
Similar to spotlight within Mac OS X, it works in a very similar way.


This is located on the right hand side of the browser pane and contains to options. A filter result and a search box.

Aperture Tutorial - The Image Interface
The filter box which balloons out, can give you specific rules to work with. Similar to smart play lists within iTunes you can add or take away as many rules you want to filter out the images. Clicking the close button will close the filter balloon.

Aperture Tutorial - The Image Interface
Some times the best (and most interesting) way to view you images is to scroll through them. And the Aperture gives you two ways to do this. An traditional scroll option, and an auto scroll.

Aperture Tutorial - The Image Interface
The auto scroll works in a way similar to a normal scroll bar. Dragging the bar up or down will scroll through the images in that chosen direction, the further up or down you move the bar the faster it scrolls. Letting go of the bar the scrolling stops and the bar returns to the center.

Aperture Tutorial - The Image Interface
The thumbnails which you view can be changed in size. This can enable you to view as many or as little images you want within the browser interface. This is done in Aperture through a simple slider in the bottom right of the interface.

Aperture Tutorial - The Image Interface
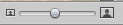
Pushing the bar all the way to the smaller icon or left hand side gives you a lot of thumbnails to pick through.

Aperture Tutorial - The Image Interface
All the way to the right and you get one massive thumbnail.

Aperture Tutorial - The Image Interface
The bottom of the browser interface is important, it offers all the buttons to rate and views you images on multiple screens.

Aperture Tutorial - The Image Interface
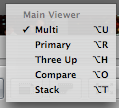
These 5 buttons give you access to how you images can be viewed on screen and are pretty powerful if you have multiple monitors.

Aperture Tutorial - The Image Interface
Clicking the left most button gives you access to how the multiple screens behave. Each show a different part of the interface. The best way to find the one you like is to click through the options. Three up shows three images on screen, Compare is an easy way to compare images, Stack shows all the images in a Stack (explained in another tutorial).

Aperture Tutorial - The Image Interface
The next button from the left is the zoom button. Clicking this will make the selected image its full size and will bring up a tiny option to move the view about. This is useful for zooming on an area of detail.

Aperture Tutorial - The Image Interface
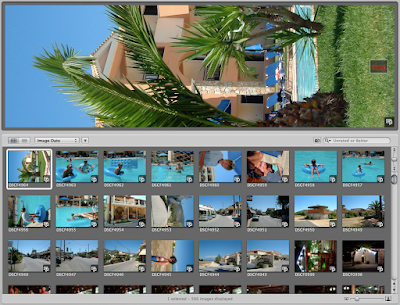
The small zoom box on the image. The red part shows what is visible on screen.

Aperture Tutorial - The Image Interface
Continuing along the row of buttons, this one shows the master image for a stack. If you have made a stack that has 20 images inside it, clicking this button will show that master image.

Aperture Tutorial - The Image Interface
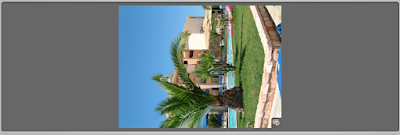
This image takes you into the full screen mode of the application. In later series I will show you the advantages and tools of the full screen.

Aperture Tutorial - The Image Interface
I am not 100% sure what this button does. Clicking it on my computer doesn't do anything. I personally think its used on multiple monitors.

Aperture Tutorial - The Image Interface
One of the tools of Aperture is to rate and promote images. An it is done with this tool bar at the bottom of the browser.

Aperture Tutorial - The Image Interface
These buttons are designed to rotate images either left or right. Simple and effect to rotate images.

Aperture Tutorial - The Image Interface
If you have take 100's of image not all of them will be worth of printing or taking to a client or external source. These buttons are to promote or demote images.
The cross gives a photo a rejection badge, the red down arrow removes a star. The green up arrow gives an image a star (up to 5). The green tick gives an image 5 stars.

Aperture Tutorial - The Image Interface
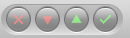
Finally the last arrow is to move to the next image within the browser pane.

Aperture Tutorial - The Image Interface
Till the next tutorial which again will be in a couple of days. Keep playing with Aperture and have fun with photographs.
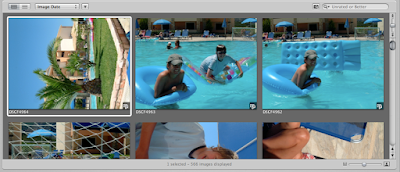
Wallpaper Wednesday - Small Bridge

Aug 22, 2007

Hey

It is time for a new cool wallpaper which you can use for your desktop wallpaper. This image I took on holiday and the setting was loverly. Leave your comments below.

Aperture Tutorial - Projects Pane - Part 3

Aug 20, 2007

Its part 3 in my ever growing series. And this one is about the projects pane. The projects pane. The projects pane located on the left hand side of the window is used to store all your projects withing Aperture. It has a variety of features to help you organize your photos.
As you can see from the image below, click for full size, there isn't much that makes up the project pane, the bottom part of the image shows what happens if you right click on this menu. Aperture Tutorial - Projects PaneThe top section allows you to create new Albums, Light tables etc. These are all for presenting your images. You can create them as blanks or from image selections.

The next section of the right hand click menu is the projects and folder options. These are designed to create new folders and projects to add images into. These are useful if you want to create a new project quickly. Below this there is the option to delete projects, which as the name implies, can delete your projects.

This menu is all about preparing your image, as a result there is the import and export options included. This is useful if you want to quickly import all you photographs quickly. The import button will get you to the same frame as the one shown in the first tutorial. Exporting is the same if you need to take a photo out of Aperture for use in another application.

The reallocate option is useful is you have moved your original photos about. Or if you want to move them to a different space on a different hard-drive.

In the middle pane in the bottom half are previews of all your images, sometimes there may be a fault with the previews or they need to be re-rendered, this option enables you to do this.

The second to last option is the slide show option, which creates a slide show of all of your images on screen. I will go into detail about this later.

Finally at the bottom of the menu is the Print Image, which prints any image that are selected.

In the next couple of Tutorials I will go into more detail about the other panes, and how you can change image effects and properties to suit the needs of you image. If you need to purchase a copy of Aperture please go to the Apple Store to find out more.

Aperture Tutorials - The Interface - Part 2

Aug 19, 2007

The interface of any program does take a while before it is usually learned. If I had a plan of action (which I don't) this tutorial should have come first. If you want to see the previous tutorial you can go to Part 1 - Importing, or you can visit the main page with all the links. This is found here in the Aperture Tutorials list. You can at any time click on the images for the full versions.
If you haven't got Aperture yet it is definitely worth buying a copy. The Apple store is the best place to get it since it is usually the cheapest than 3rd parties.

If you are ready I will give you a quick lo-down of the screen interface. (In hindsight importing the pictures first wasn't a bad idea as some of the features could be missing)

The main interface is as shown, you have your projects on the left, the main window in the middle, and the adjustments pane on the right. At the top of window you have the tool bar. Currently out of sight is the menu bar from Apple.

Aperture Tutorials - The Interface
At the top of the window is the tool bar. This small bar is an area which you can use to place icons for shortcuts in the program. You can customize this small area quite heavily to fit your needs. One note, as a first time user or an inexperienced person, having the names to the icons is a create help to start learning what everything does.

Aperture Tutorials - The Interface
Further along the tool bar there is the tools. These again complete small actions to photographs. Alone from the left, you have: Select, Rotate Left and Right, Straighten, Crop, Spot and Patch Tool, Red Eye, Lift and Stamp. Each of these Tools will be discussed in further detail.

Aperture Tutorials - The Interface
Further along the tool bar still, I have the loupe, Keywords HUD, Adjustments and Metadata, icons. The tool bar might be different to yours but these icons can always be accessed from other places.

Aperture Tutorials - The Interface
Moving around the window interface in a clockwise direction, is the adjustments pallet. This as shown in the buttons above can be changed between the Adjustments and Meta data. One this palette are loads of tools which can be used to change different values of your images. Each one shall be discussed in detail later.

Aperture Tutorials - The Interface
Continuing still there is the bottom part of the window. The buttons on the left are concerned about how the images are being displayed, the buttons in the middle are about rating and promoting different images in a stack or project.

Aperture Tutorials - The Interface
The image below shows the centre part of the screen. The top half is the current image or images being selected. With the bottom half showing the thumbnails. The thumbnails can be controlled with the thumbnail slider in the bottom right corner to change there size.

Aperture Tutorials - The Interface
One other main part of the interface is the project menu. This area, much like other parts of other programs with Apple shows a tree view of your projects and images. These can be organized into folders by right clicking on the menu and selecting what you want. This will be discussed later (probably in the next post).

Aperture Tutorials - The Interface
Hopefully you have found this useful as a beginners introduction, I shall be going into a lot more detail next time about all the small details and changes that can be made. From there I will be showing you how to edit photos can make the most out of them.

Aperture Tutorials - Importing - Part 1

Aug 18, 2007

Aperture is a great pro tool for both professionals and amateurs for tweaking and organizing photographs. Having snagged a promo copy from Apple and fiddle about with it a lot, I am going to show you basic and advance tips to help you with getting the best out of Aperture. Having just been on a holiday I have lots of not so perfect photos to work with this would be a great to show you what to do. If you want to buy your copy of Aperture now is the best time. Apple have just lowered the prices. Click here to find out more.

This session is going to show you about importing photographs into Aperture and the sort of information you can add to make sure they are imported correct so you don't have to re add them at any time. For any of the image you can click on the image for a full size version.

To import pictures there are 2 basic ways, from the import button on the menu bar or from File > Import, you will then be give the options screen so you can import your photos.

Aperture Tutorials - ImportingAperture Tutorials - Importing
The option screen all gives a lot of options it is pretty simple to navigate. On the left you have the import to option. You may need to click or create a new folder or project for you photos to go in.

The middle frame is the photos that you want to import, you can usually select a folder path from the top boxes, but I am importing them directly from an external backup drive. If you only want to select a couple of images you can use the command key to select the ones you want. By default by selecting any of the image they will all be imported.

Aperture Tutorials - Importing
As you can see the directional arrow shows the import path.

Aperture Tutorials - Importing
The left hand pane shows the import options for your photos. You can keep all the defaults if you want, although you have the option of changing file names, and the EXIF data.

Aperture Tutorials - Importing
One option that should be of note is the location of the photos, you can import them to a variety of locations, the files are moved upon import.

Aperture Tutorials - Importing
Finally you can click the import all or the import x, as you have selected in the photo thumbnail pane.

Aperture Tutorials - Importing
After importing the small swirling icon in the bottom of the window will move as the files are being imported, clicking on this will give you the current status of the import.

Aperture Tutorials - Importing
After everything is done your files will be imported and you are ready to work with them.

Aperture Tutorials - Importing
The next step (due either tomorrow or in 2 days time) will show you the basic overview of the features on the main screen. Over the course of time I will delve deeper and deeper into the program. You can find more on this topic by using this URL.
The next post after this is about the Aperture Interface.

Creating An Interesting Picture WaterMark

Aug 14, 2007

Nearly all websites on the internet water mark there image is some way so if it does get posted on another website people might go visit to check out the original source. But how do you create a watermark that is cool and of a modern internet style, yet still attracts attention but doesn't take the focus away from the image.
By simply create a semi transparent text this can be easily achieved within Photoshop. And this simple tutorial will show you how that can be done. All you need is Photoshop or a similar graphical editor and a good set of standard fonts or your personal preference. You can click any of the images for the full size versions.

Step 1)

Find you image that you want to watermark and open it in Photoshop. This is of a military aircraft from a recent air show.

Creating An Interesting Picture WaterMark
Step 2)

Add you text. This can either be the name of your website (if its popular and is easy to find in search results) or you website address. I have chosen the later for another website of mine.

Creating An Interesting Picture WaterMark
Step 3)

This is more of a personal preference of mine but change the text size shape and space to one that suits your needs. The character palette in Photoshop is excellent at doing this.

Creating An Interesting Picture WaterMark
Step 4)

Once as you have the style of the text that you want it is time to add some colour. Personally I would stick with grey as that seems to complement the style nicely.

Creating An Interesting Picture WaterMark
I've picked a darker colour (although I have changed this to a slightly lighter colour in later renditions)

Creating An Interesting Picture WaterMark
Step 5)

One of the defining parts of any water mark is where is it placed. Stuck in the middle or at the bottom looks boring an normal. Try placing it on one of the edges. Experiment to pick a style that looks best.

Creating An Interesting Picture WaterMark
Step 6)

Play about with the opacity of the layer. Changing this can really change what the water mark looks like and how it works with your image. Again experiment with opacity and layers blending to find a style that works for you.

Creating An Interesting Picture WaterMark
Not bad for 5 minutes work. Creating a script like that can be easily done to add the water mark to any image. All is needed is some repositioning.

Creating An Interesting Picture WaterMark